Early thoughts on the Stabilo EASYbirdy fountain pen.

This post is unashamedly about an entry-level school pen for those who enjoy trying fountain pens from the lower end of the spectrum.

It is getting on for six years since I wrote a post on the Stabilo EASYbuddy, a chunky, robust, plastic fountain pen designed for children. The EASYbirdy looks very similar but has some important differences.

Stabilo EASYbirdy fountain pen.

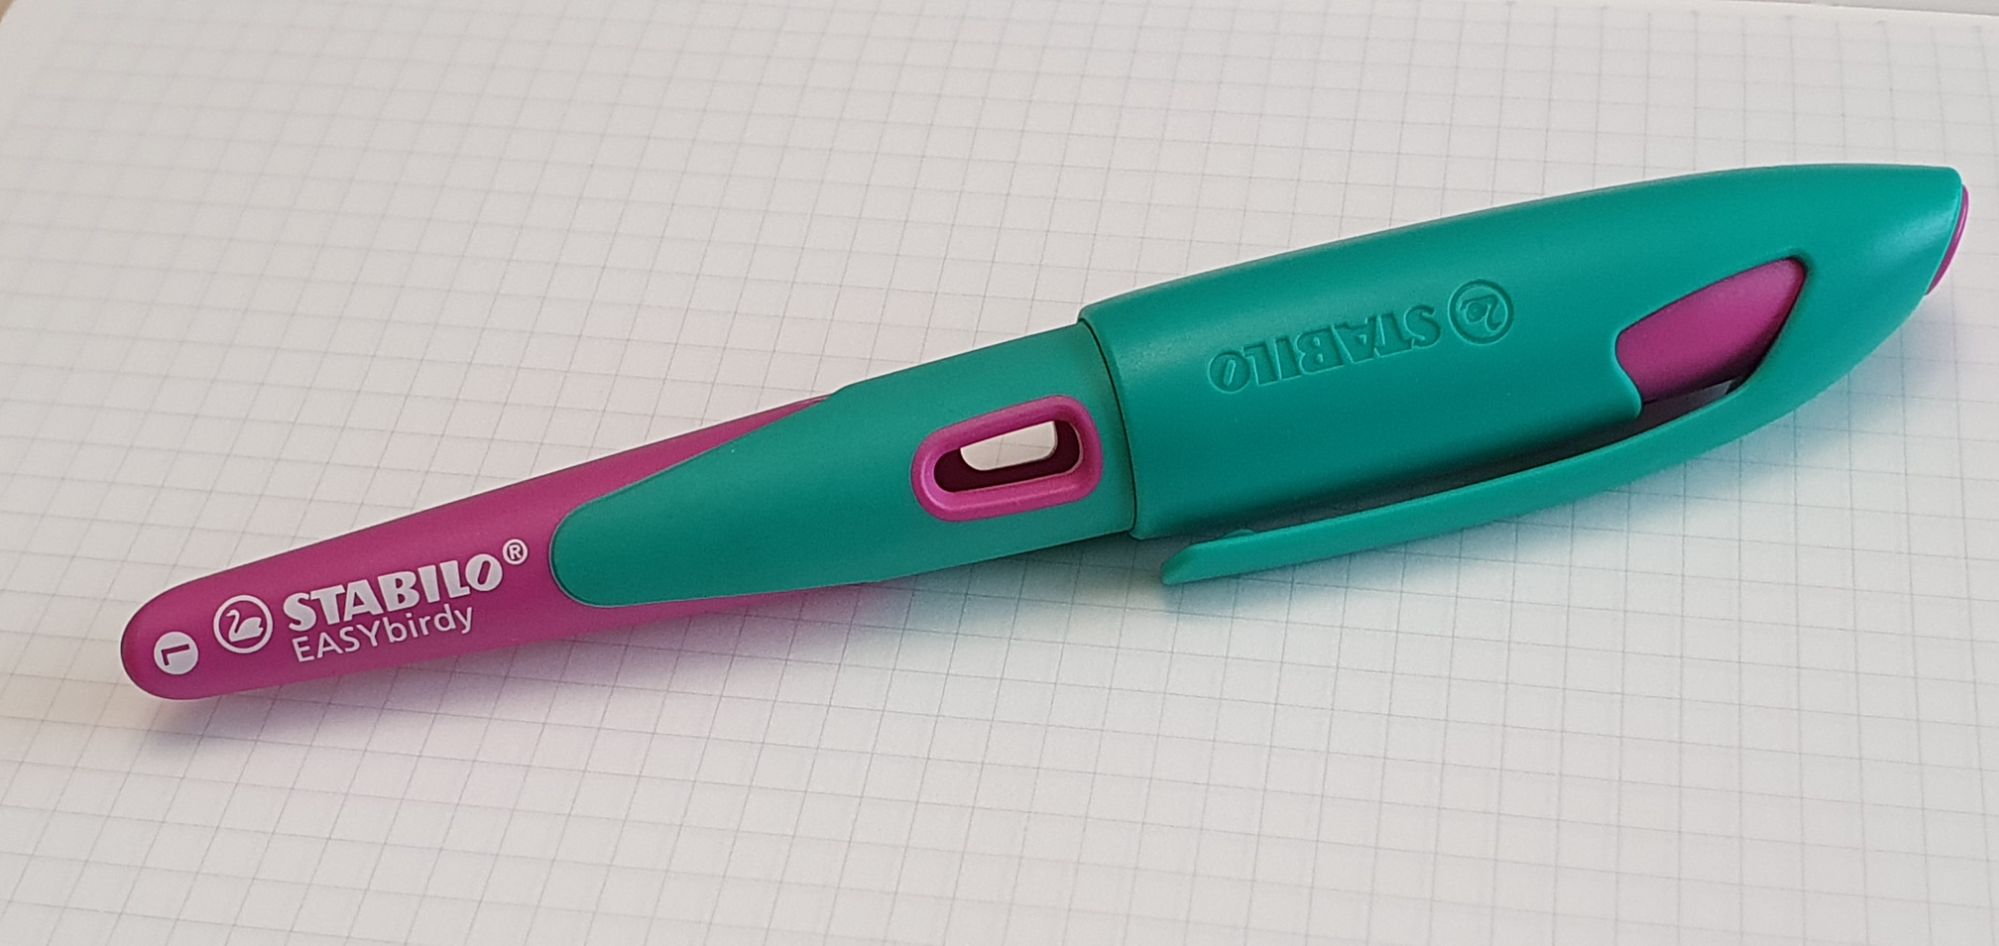
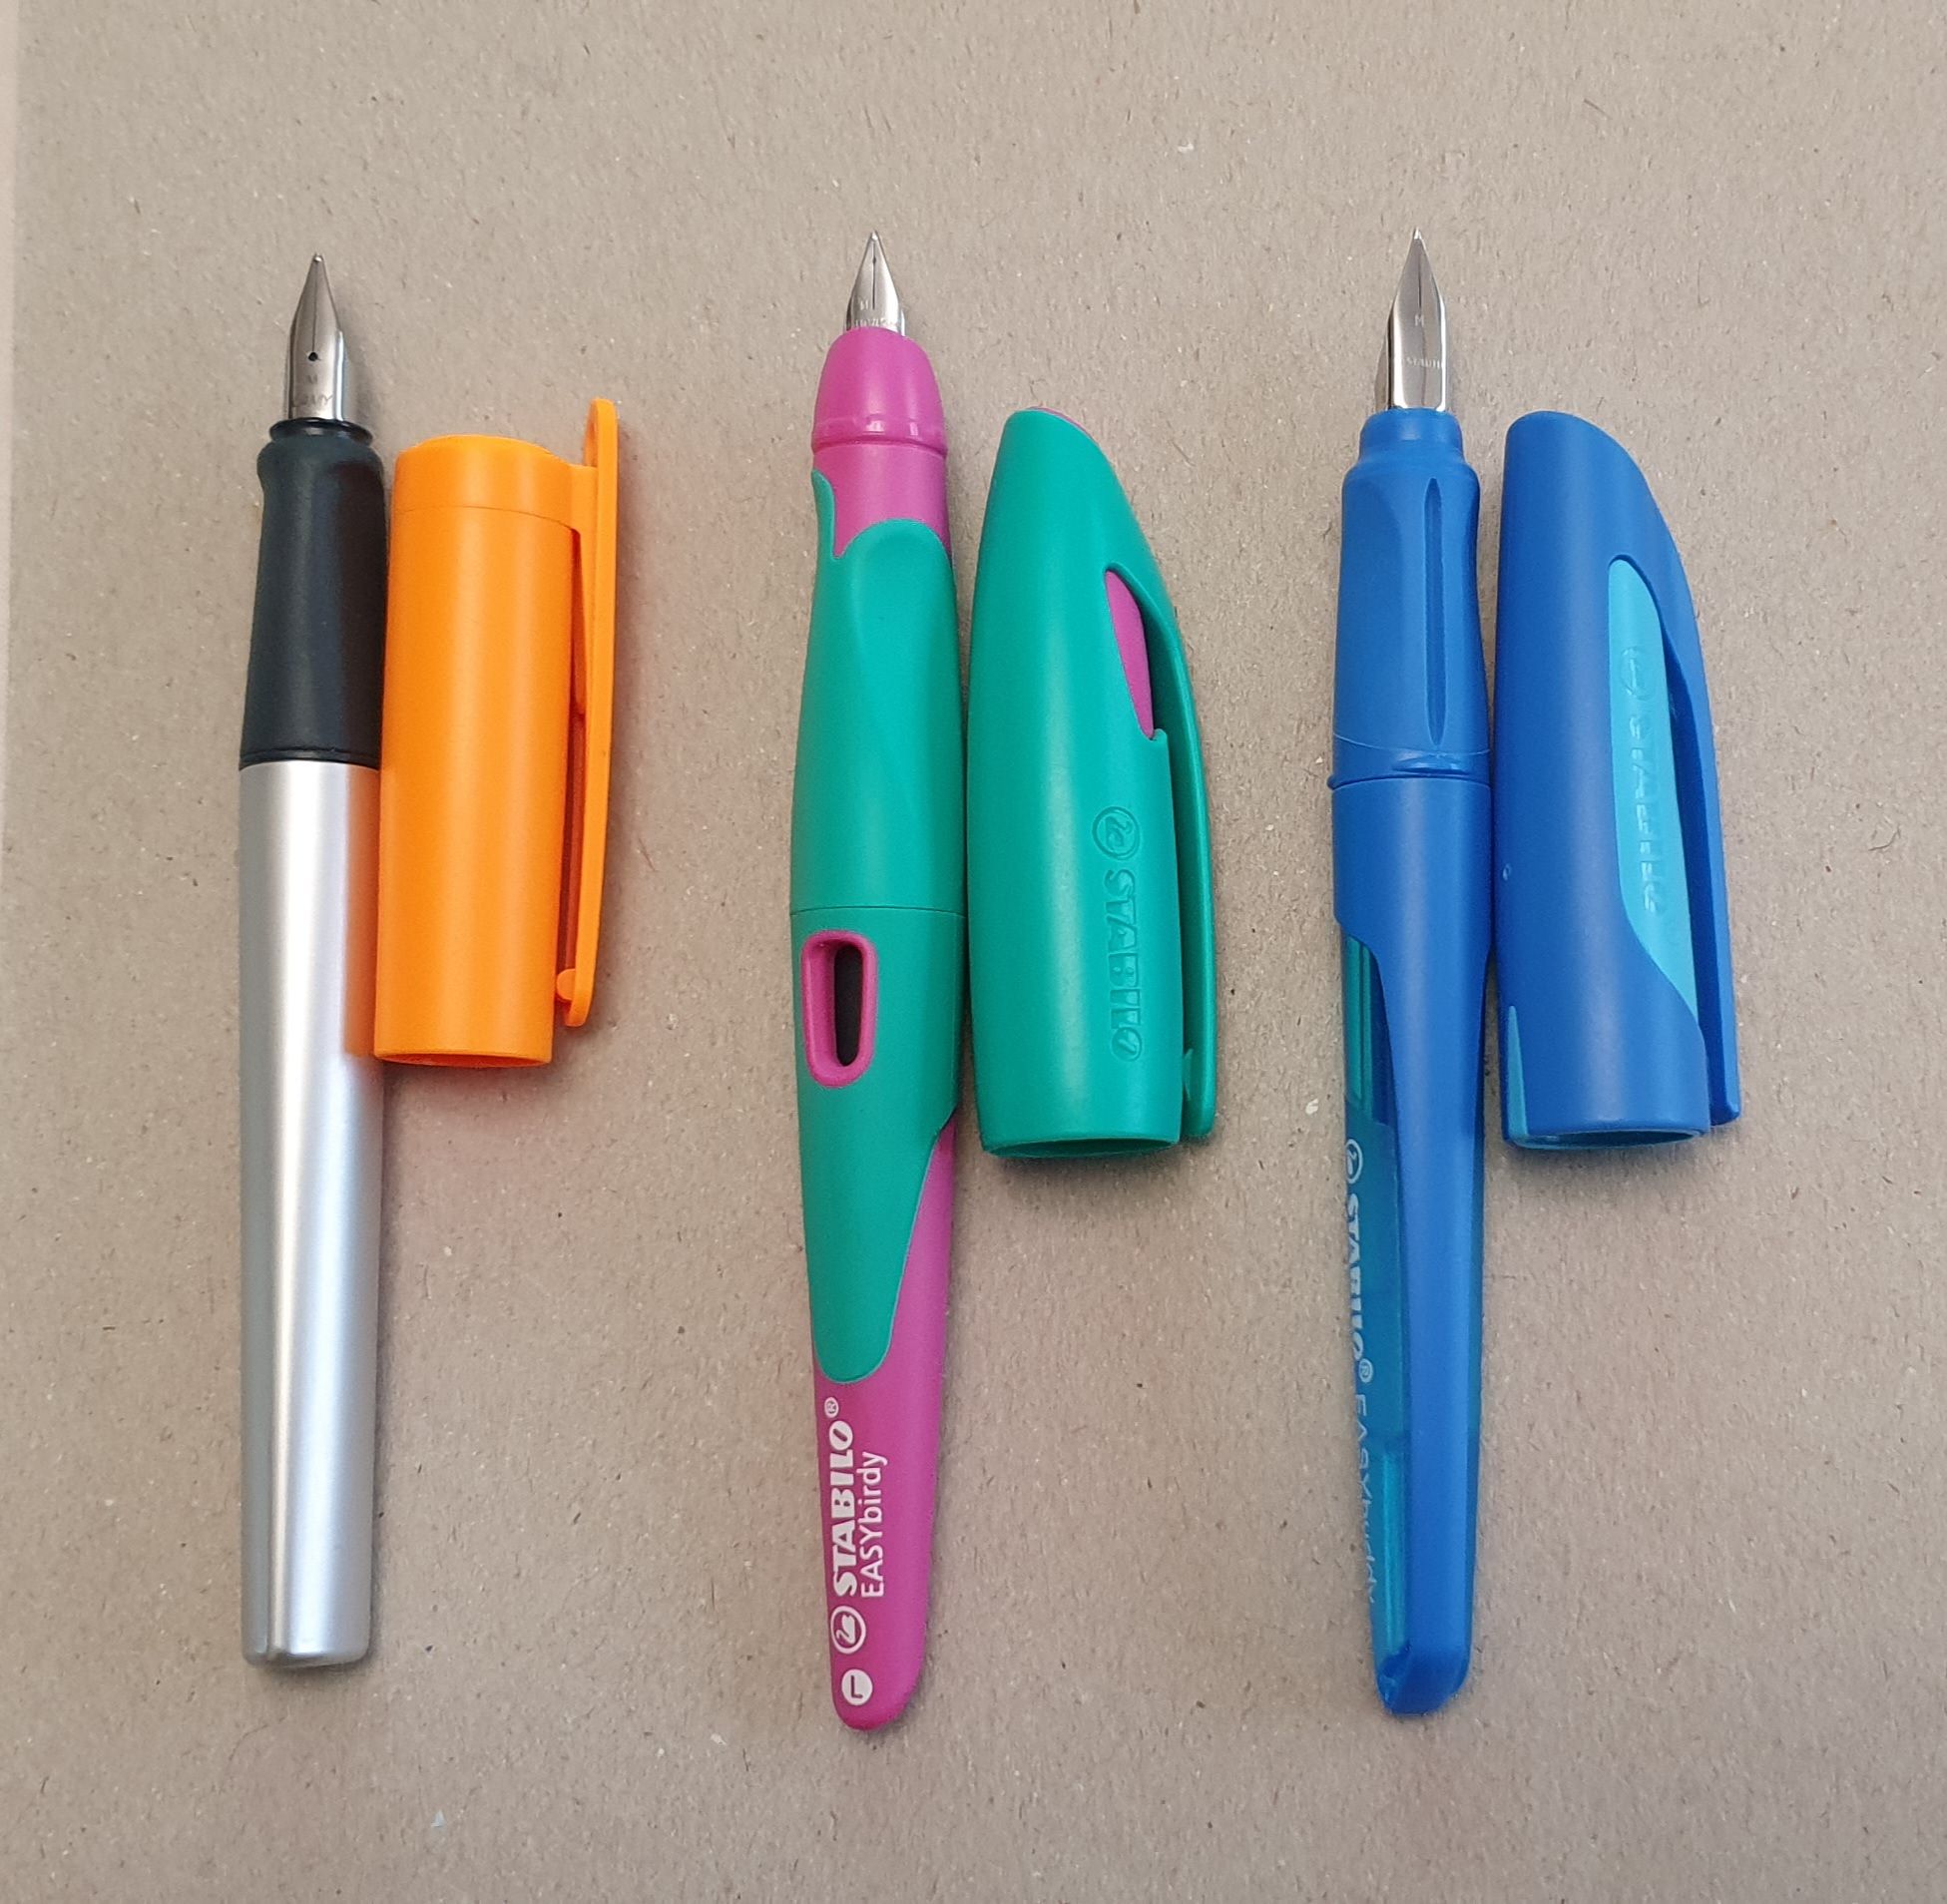
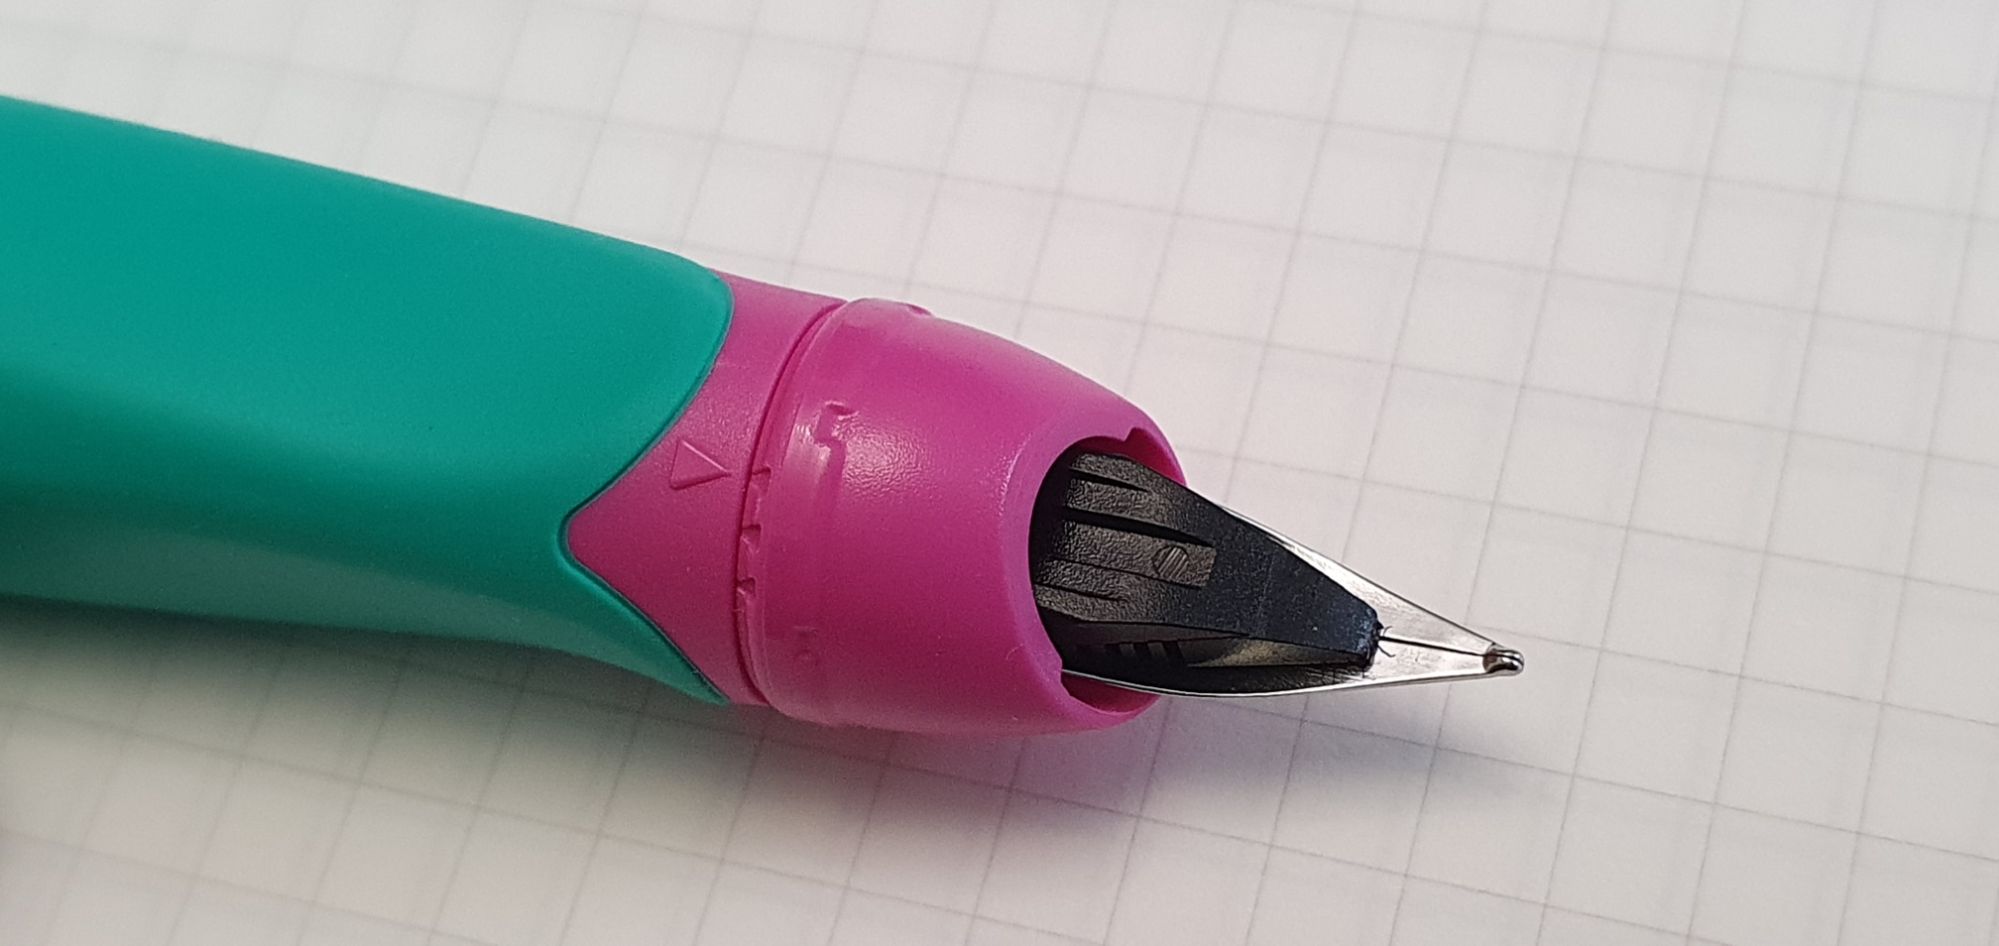
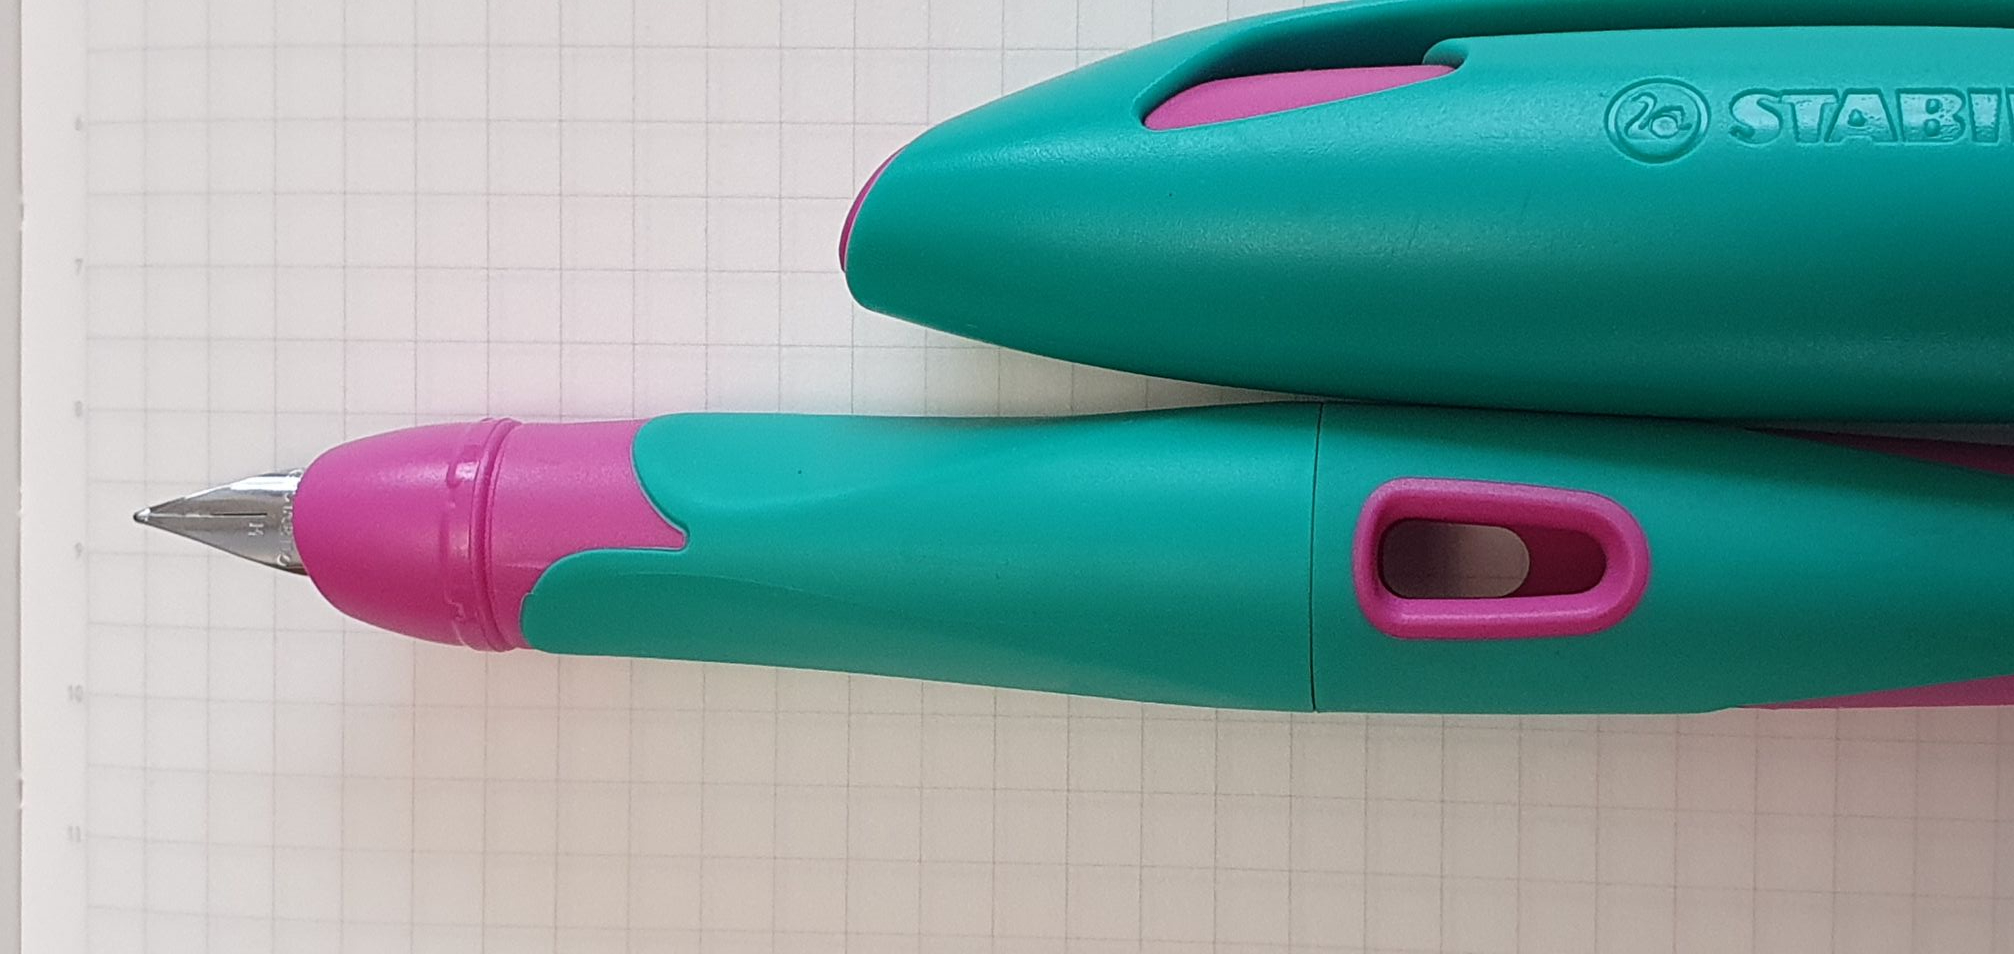
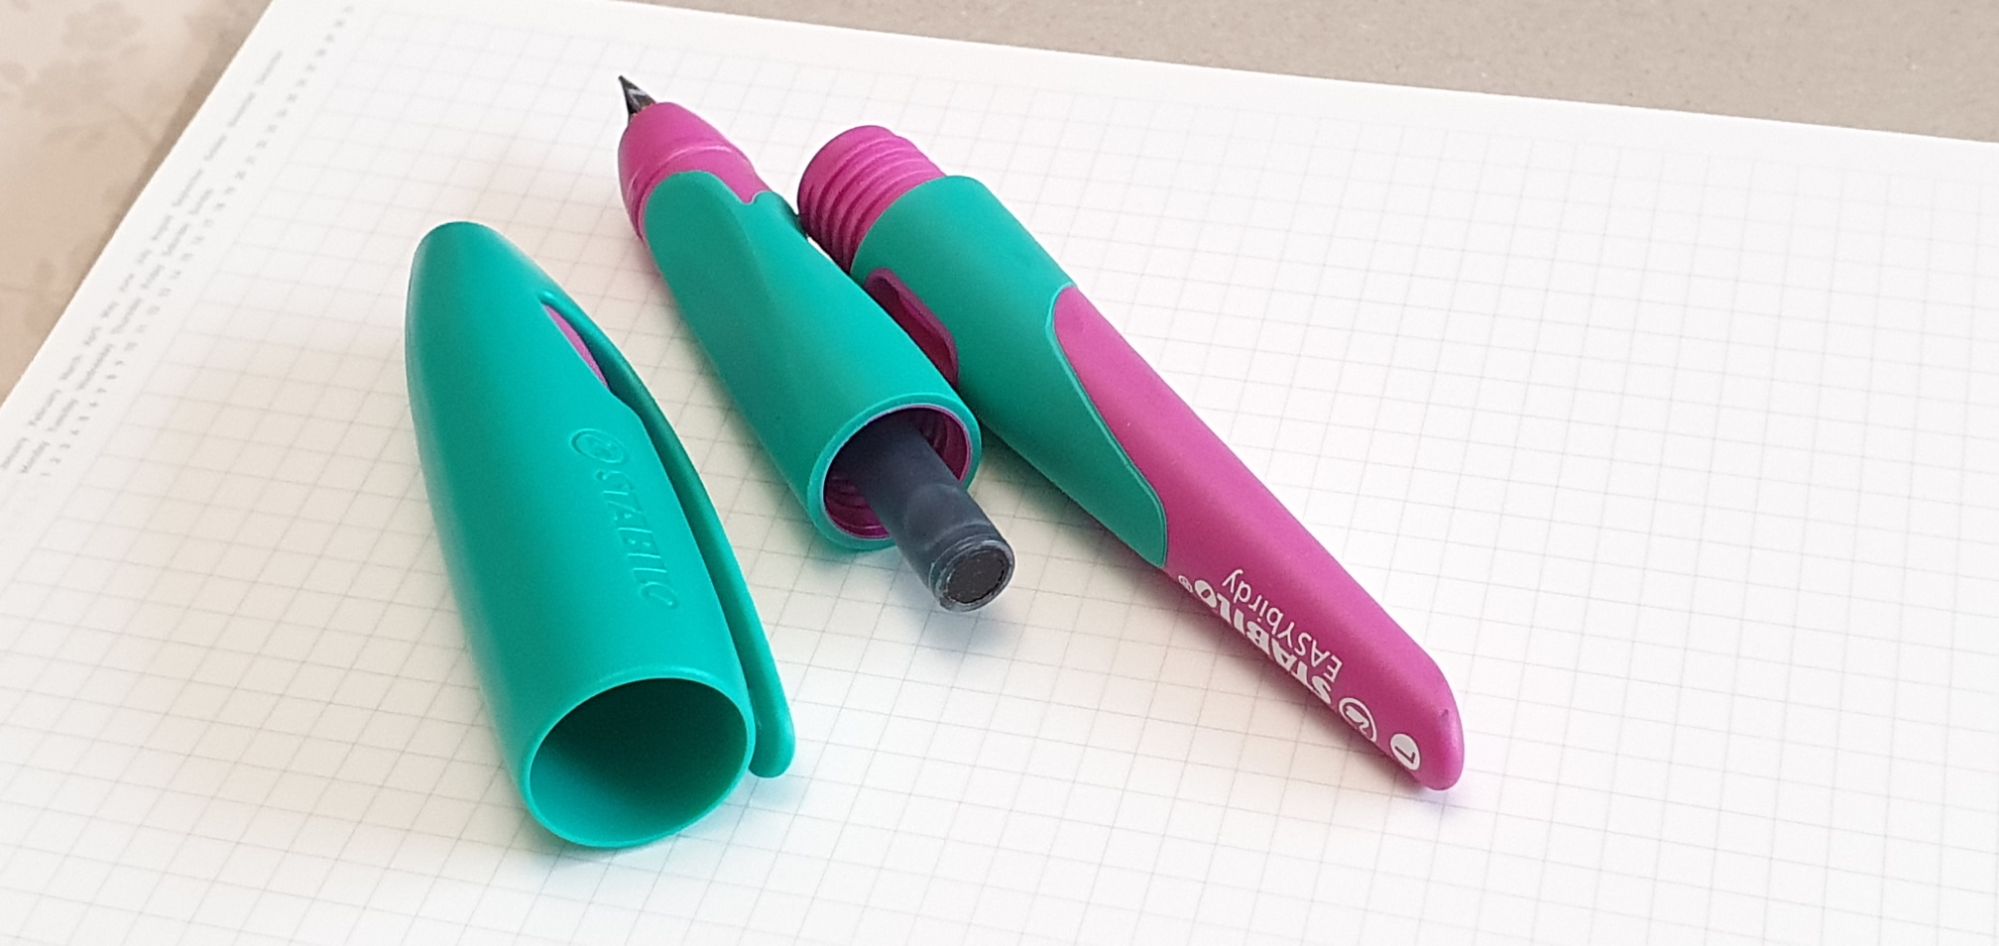
Examined side by side, the EASY birdy is about 10mm shorter when capped, yet the same length as the EASYbuddy when uncapped. The EASYbirdy has a shorter barrel, a longer section, a smaller and “unglazed” pair of ink windows, unequal length facets for the thumb and forefinger, and a semi-hooded nib.

Stabilo EASYbirdy with Stabilo EASYbuddy (right) and Lamy Nexx (left).

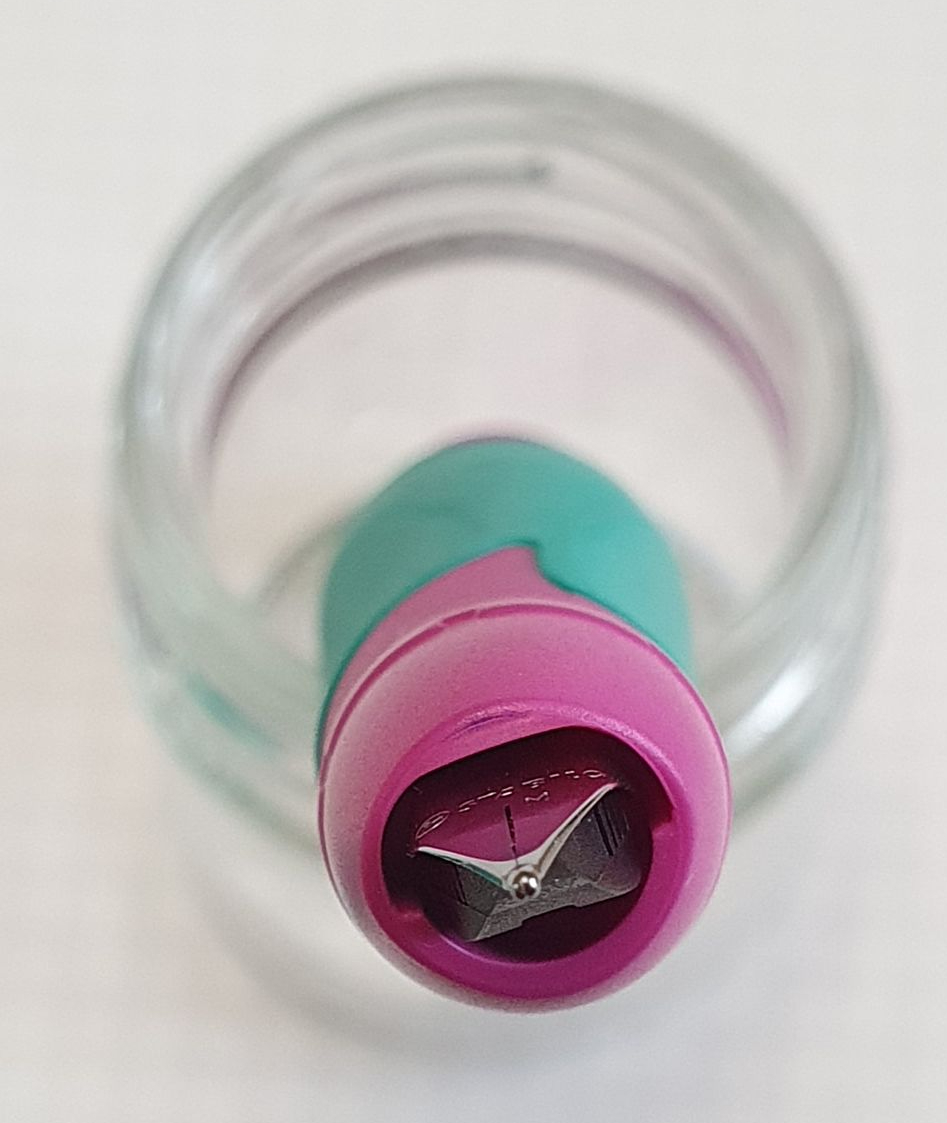
But the most significant distinctions are that (a) the EASYbirdy is available in Left or Right handed versions and (b) has an adjustable nib-housing, allowing the nib to be rotated either left or right, or centred, in relation to the grip facets.

Nib housing showing different settings.

As a lefty-overwriter myself, I was intrigued by this design. I was keen to see how it worked and whether it was of any benefit to me. I spotted a half-hidden display of these pens in a local stationery/computer repair shop, on a shelf behind numerous boxes of roller-ball and gel pens.

The EASYbirdy sample tray contained six pens: three for left-handers and three for right-handers. The pens for lefties were all in pink and green with “L” at the tip of the barrel. The pens for righthanders were green and blue with “R” on the barrel.

It took me a while to spot how the left and right hand versions differed, before eventually noticing that the facet for your forefinger came down a little further than the facet for your thumb. This hardly seems necessary but I suppose it helps towards a grip whereby the forefinger is flatter against the section instead of being bent at a right-angle.

The shorter facet is for the thumb on this left-handed model.

Having grasped this, I was still confused about the off-setting of the nib and why there were so many display samples in the tray. The answer is that a customer, whether left or right handed, can try writing with pens with nibs pre-set to left, right or centre, (labelled as -1, 0, and +1) to see which is most comfortable.

The retailer can then dial in this adjustment to a new pen, using his special plastic Stabilo tool (NOT sold with the pen). If not right, the pen can always be brought back for the nib rotation to be altered.

With facets at “ten to two”, this shows my nib rotated for a lefty overwriter.

The only other fountain pen that I can think of with a faceted grip and the ability to rotate the nib, was the Parker 75 in which you simply gripped the nib and feed, and twisted them one way or the other as desired. The EASYbirdy system is different: a tool is needed. Also, you do not apply the tool to the front end of the pen, as you might expect. Rather, you remove the barrel and use the tool to loosen the housing from inside the section. Once loose, the angle can be altered and the tool is used to tighten it up and lock it in place.

Likes.

The steel nib writes smoothly and with good flow. The pen takes standard international cartridges. If using the short ones, there is room for a spare in the barrel, making for a great outdoor and EDC pen. The length of the pen uncapped, at around 133mm together with the generous girth (even allowing for facets) makes for a comfortable pen. The left and right options, together with the ability to rotate the nib, means that there should be a version and setting for everyone.

A cartridge inserted with room for a spare in the barrel.

Dislikes.

The need for a tool, which is not included with the purchase, is a little disappointing. I can understand that, once set up in the shop, most people may not want or need the tool again. Personally I would like to have my own or it would be even better if the tool could somehow be built into the cap or barrel. The push-cap is secure but does not click. It does not post either, although the pen is long enough without posting. The colour scheme of pink and green is not to my taste, although distinctive. I accept that I am not the target age group.

Conclusion.

I am not generally a fan of faceted grip sections on fountain pens, which dictate how you must hold the pen to the paper and punish you with uncomfortable ridges if you do not comply. But here we have a rubbery ergonomic grip with the option to rotate the nib. The pen fits the user; the user does not have to fit the pen. I do find that I can hold the pen at the facets whilst still having my nib rotated inwards. For lefties especially, this could make writing a little more comfortable, whatever your age.

Lefty overwriting with the EASYbirdy.

Vision Aid headband magnifier – early thoughts.

One of the enduring pleasures of the fountain pen hobby is watching fresh ink on the page as you write. If you happen to be in a room with spot-lamps in the ceiling, you may even watch the wet ink gleaming before it dries.

This simple pleasure is enhanced if observed through a magnifying glass, especially if it has a light. However, it can be awkward to write with a magnifying glass in the other hand, especially if the focal length is such that you need to bring your eye close to the lens.

Tinkering with fountain pens also entails cleaning, nib adjustment (or “tuning”), maintenance and repair, which are also occasions when a magnifying glass is helpful. If you find a hands-free solution, so much the better.

Over the years, I have accumulated many magnifying glasses of various types and quality. There is no single solution: you may require some to use at home (with differing magnifications) and a portable one to carry easily.

Some magnifying glasses accumulated over the years.

There are pro’s and con’s to all of these and some prove more successful than others. Glass lenses may be superior to plastic, but are heavier. The large white “Fancii” model above offers an unusually large diameter lens, fortunately acrylic and lightweight, which is good for maps and reading but suffers from pincushion distortion such that a page appears to have a bulge or bubble in the middle. Those with LED lights are useful but carry a risk of the lights being switched on accidently whilst being carried which will drain the batteries.

Of those pictured above, the black and white Eschenbach Mobilux, 7 x 28 D 60, made in Germany has been the most successful and also the most expensive (currently £70.56 on Amazon). I have had mine for years and use it almost every day. It came with a slip-on protective lens cover but I also secure the LED on/off switch with an elastic band when travelling with it.

“Loupes I did it again.”

These metal and glass jeweller’s loupes are very handy, and came with plastic boxes. The larger one has LED lights.

Over the years I have tried some hands-free solutions, such as the one below on a flexy stem and which also has a smaller lens with higher magnification in one area of the main lens. This is essential for two-handed tasks, such as flossing a nib with brass shims. The other, folding model below was supposedly for knitting and crochet and such like and can be held around the neck whilst propped up on your chest for hands free close work. It also has an LED light.

The flexy-stem model sees regular use and lives permanently on my desk. I use an envelope to cover the lens when not in use, in case of sunlight causing a fire.

There are numerous hands free, inexpensive headband magnifiers available on Amazon. If you plan to wear one over spectacles, this must be taken into account when choosing. A few years ago I ordered a very simple headband magnifier complete with four, slot-in lenses for under £10.00 but did not find it very satisfactory and used it only a few times.

The most basic of headband magnifiers, supplied with four different lenses.

Does the job but there are better options.

It is against this background, that I saw the Vision Aid magnifier on Amazon, with over 4,200 reviews, an overall rating of 4.4 stars, in the “Amazon’s Choice” recommendations and with a slight discount, to £29.99. I read some of the reviews and decided that it was worth a go.

Vision Aid headset magnifier with lens storage box and a carry case.

As always, there were some negative reviews too and I noted the issues that some buyers had, to pay particular attention to these when it arrived but was encouraged by the many accounts of good customer service in the event of problems.

When it was delivered the following day, my initial impressions were very positive. This is a headset magnifier with LED lights and lenses in five different powers. To list its features:

  • Acrylic lenses of 1.0x, 1.5x, 2.0x, 2.5x and 3.5x. (a 1.0x magnification power is 100% increase in the magnified object’s size. For example a 1 inch object at 1.0x magnification would appear to be 2 inches);
  • Plastic storage box for five lenses with slots for each lens;
  • The lens are quick and easy to fit; they just click into place; a spring clip automatically clamps the lens into place;
  • Headset supplied with folding, removable plastic arms and an adjustable elastic strap which is preferable for users who wear spectacles;
  • The headset has rubber-covered nose pieces, to rest on the bridge of the nose; to use the headset with your own spectacles, allow the nose-pieces of the headset to rest on the bridge of your nose, behind your eye-glasses, (that is, BETWEEN your eye-glasses and your face);
  • Headset has lens mount which can pivot up and down, slide forward and backwards (for optimum focus) and tilt inwards or outwards to suit the position of the object.
  • Two LED lights are mounted; the direction of the lights can be adjusted up and down in four steps;
  • The LED switch alternates with each press for low, high and off;
  • The version I chose has a rechargeable battery, charged via a USB cable supplied; a red light on the headset shows when it is charging which turns green when fully charged; (mine was partially charged on arrival but charging fully took about 40 minutes); a version requiring batteries is also available but I presumed that the rechargeable option may be lighter;
  • Accessories supplied are the USB charging cable, extra rubber covers for the nose brackets, a soft lens cleaning cloth, a User Manual and a very nice, zippered clam-shell carrying case with a nylon mesh accessory pouch and a moulded clear plastic insert, which can be kept to hold the items snugly in place, or discarded if preferred.
  • The carry case has a tough plastic handle over the nylon strap and plastic covered tabs for the double-end zip, which are nice touches (and nice to the touch).

After charging the LEDs fully and reading the large-print User Manual I was ready to slot in a lens and try it out. I started with the 1.0x magnification, the lowest power, but was immediately impressed that items on my desk were suddenly clearer! I picked up a pen and examined its barrel and then the nib. All crystal clear and hands free! All other lenses were equally good but with each increase in magnification requiring a shorter distance between the eye and the object.

Trying some reverse writing. My “Year of the Dragon” plush toy keeps to himself.

I then tried writing with the headset on. This is no problem at all. No more need to hold a magnifying glass in one hand! Bright illumination when needed! The Amazon description claims that the lights can provide non-stop use for 7 hours. I have not tested this and presume that it would be at the lower brightness setting.

I looked again at my list of issues that a few negative reviewers had mentioned. These included complaints that nose clips were not included; nose clip screws were loose, the arms snapped off, the lenses did not clip in and the battery did not charge. I am glad to report that I did not have any of these problems with my set.

Finally, I read in one of the reviews that the product is made in more than one factory and that quality control standards were variable. I also noticed similar-looking products on Amazon, some considerably cheaper, but with brand names like a series of random letters rather than Vision Aid. I cannot vouch for these.

All in all, though early days, I think this is a great product and great value. And I am speaking as someone who has bought his fare share of magnifying glasses in his time.

Too good a pun to leave out.

The taming of the Scribo, Write Here Africa fountain pen.

In April I spent a delightful week in Shropshire on the Netley Hall Estate, a few miles south of Shrewsbury. The Shropshire Hills National Landscape is a beautiful region. We enjoyed visiting nearby towns, with streets lined with picturesque half-timbered buildings dating from Tudor times.

A street scene in Ludlow.

I was eager to visit Write Here, the superb independent fountain pen shop in the heart of Shrewsbury. This was my first time in the town and I had hoped to visit ever since learning of this shop and meeting John Hall regularly at pen shows.

Write Here, Shrewsbury.

The shop was everything I had expected, and more! I could have spent hours browsing the fountain pen displays. It was just as well that I was constrained by the two hours maximum stay where I had parked my car, plus the knowledge that my wife and mother-in-law were meeting me in a nearby coffee shop.

In the preceding days, I had formed a desire to buy a Scribo, a grail pen at the outer-limits of my spending comfort zone, although quite which version and with which nib, I had not decided. I had tactfully asked my wife whether there were any rules that I needed to know before visiting the shop. “Only buy one pen” she replied. Right. Better make it a good one then.

In the shop John asked whether there was anything in particular that I would like to look at. I asked to see two Scribos: one being the Write Here “Africa” and the other, a Feel “Blu Califfo.” (The Blue Caliph is a variety of fig and the pen is a lovely deep dark blue with small bursts of orange in the resin).

The Scribo Write Here pens are produced for Write Here in annual limited editions of just fifty numbered pieces, the “Africa” being the current version. Previous edition colours were (1) grey with lime green, the Write Here shop colours; (2) Cardinal red and Noble green (the only year in which the fifty pens were split between two colours); (3) Blue; (4) Tropea (named after a type of red onion); and (5) Mariana Deep Blue.

A Scribo Write Here Africa.

Like the Scribo Feel but without its faceted body or bulbous barrel, the Scribo Write Here editions are also piston fillers and have the same renowned gold nibs and ebonite feeds, in 14k (extra flessible) or 18k gold, with Rhodium plating. Others have already reviewed the Scribo Write Here fountain pens, including UK Fountain Pens, SBRE Brown, The Pencil Case Blog and Dapprman. What follows is the tale of my own purchase and getting acquainted with the pen, rather than another review.

Scribo was formed by employees of the former Omas pen company and produces nibs with the same tools and to the same specification as Omas. I have never owned an Omas pen but it is common knowledge that the Scribo Feel and Write Here models have very desirable nibs which are just like the Omas OM81 nibs of old.

The 18k gold broad nib.

Back to my decision-making. John provided a table and ink and anticipated that I may wish to use my own paper. I produced my Stalogy A5 notebook and had a blissful time trying both the Feel Blu Califfo and the Write Here Africa. I soon decided that I would not go home without buying one of them!

To narrow down the options, I ruled out the 14k Extra Flessible nibs as these can be difficult to use for a lefty-overwriter and easy to spring. That still left a range of beautiful nibs in 18k gold. I tried the Africa with a fine nib. John then swapped in a new broad nib for me to try. In the Blu Califfo I tried an extra fine, which I also liked. I did not need to try the extra extra fine.

The Africa cap.

I was struggling to chose between the Africa and the Blu Califfo as I liked elements from both. The Blu Califfo was a gorgeous blue, my favourite colour and very slightly longer. I liked its faceted body but not so much the aesthetics of the bulbous barrel meeting the straight section, although admittedly, very comfortable to hold.

The Africa however, was like a vintage tortoiseshell colouring but more hardcore, like a leopard and with patches of clear acrylic resin. This had one advantage, namely that you could see the ink level between the black and golden-brown flecks of colour.

Nib-unit and section.

To help with my deliberations, John suggested showing me something completely different. I then enjoyed his personal guided tour of all the pen displays, including Pilot, Sailor, TWSBI, Conway Stewart and a generous range of Leonardo pens, with his comments on the various merits of them all. This was refreshing and I saw several pens that I had not seen in the flesh before. As John said, most pens look better in real life than in photographs.

Returning to the table, I weighed up the two Scribos again. As I felt that I would be happy either way, I chose the Africa on the grounds that you could see the ink level, it did not have the bulbous barrel or metal ring at the end of the section and was also the lower priced of the two.

As for nibs, I already had a good number of pens with medium and fine gold nibs but fewer with broad nibs, especially a stubby broad. John added, perceptively, that I had looked the most comfortable whilst trying the broad nib. This clinched it and so I became the happy owner of the Scribo Write Here Africa, number 25/50, with an 18k broad nib.

Scribo Write Here Africa unboxing.

I would like to say that I took it home and all ended happily ever after. I should have filled the pen and just got on with it, allowing it to run in, but could not stop myself from tinkering with the nib. On close examination, I felt that the nib was not quite centred over the feed. Foolishly, I tried to adjust this by twisting the nib in situ, as though it were a steel Jinhao. This might have moved the nib by the tiny amount needed, but put the tines out of alignment. This required some further tweaking, until the tines and the tipping were level again. Another problem then manifested itself, in that the tines rubbed and clicked against each other whenever I put pen to paper, which I hate. I managed to cure this by flossing the tines with my thinnest gauge of brass shim, checking that the tines were still level. But this may have added to what was already a generous ink flow.

Stubby broad tipping and an ebonite feed!

The writing experience of this beautifully crafted nib was initially marred by skipping and overly wet ink flow. For the first two weeks, I probably tinkered with the nib every day, trying to get it to be as good as it could possibly be. The tipping was super-smooth and gave a juicy broad down stroke and a fine cross stroke. By holding the pen vertical, a double broad effect was achievable. By turning the pen over, the tipping allowed a stubby fine line, which was useful but scratchy.

One of my many pages of writing samples.

I also changed inks every couple of days and am already on my fifth ink. I wondered whether, in view of my nib tuning efforts, I should heat-set the nib and ebonite feed. I read a few different and conflicting guides on this. Using hot water to heat the feed is safer than a flame. One account warned that hot water might discolour the ebonite. But after holding back for a few days, I could no longer resist trying the hot water technique. I unscrewed the nib housing, extracted the nib and feed carefully, checked symmetry over the feed and pushed them back in their housing. I boiled some water, poured it into an egg cup and then dipped the nib and feed in the water for 30 seconds. I then withdrew them from the water and pinched them together for 20 seconds.

The better way to align nib and feed.

The result is that all now looks good again. The nib is still super-smooth and prefers paper with a bit of texture. It skips at the beginning of words sometimes, which I think may be due to “baby’s bottom” but this is improving and should continue to do so. It still writes very wet but I am reluctant to try narrowing the tine gap in case I reintroduce the tine-clicking issue, or put a bend in the tines.

Notwithstanding these self-induced tribulations, I love using the pen. I still cannot walk past it without picking it up to write a few lines or more. The feel of this nib on paper, its bounce and the line that it produces are addictive and the pen is like nothing else in my collection.

Rather than this being a pen nib that needed taming, it may be truer to say that it was I, who should have shown a bit more patience before subjecting it to my nib-tuning experiments. But I am confident now that the pen will be great if I can allow it to settle down.

I am thrilled to own a Scribo at last and am most grateful to John Hall at Write Here for giving me so much of his time on my visit.

A view from The Burway, near Church Stretton. Some students meeting some sheep.