Going for a dip with the Moonman glass nib pen.

One risk you take in the fountain pen hobby, is splashing out a large sum of money only to find that it is a disappointment and poor value. On the other hand, occasionally you can buy an inexpensive pen and be genuinely delighted with it exceeding your expectations.

Fortunately this is the case with my newest arrival, a Moonman glass nib pen. This story began when I read a review of the Moonman n6 by Anne on her blog Weirdoforest Pens, a few weeks ago. I was thrilled at the potential of a glass nib housed in a conventional fountain pen body, with a cap, that could be easily transported. I promptly set about finding and ordering one from ebay.

I thought that what I ordered was the same model as Anne’s pen, but evidently I had not paid close enough attention. If hers is the n6, then mine must be something else! Anyway, I will show you what I bought:-

Moonman glass nib dip pen, in Autumn Leaf acrylic.

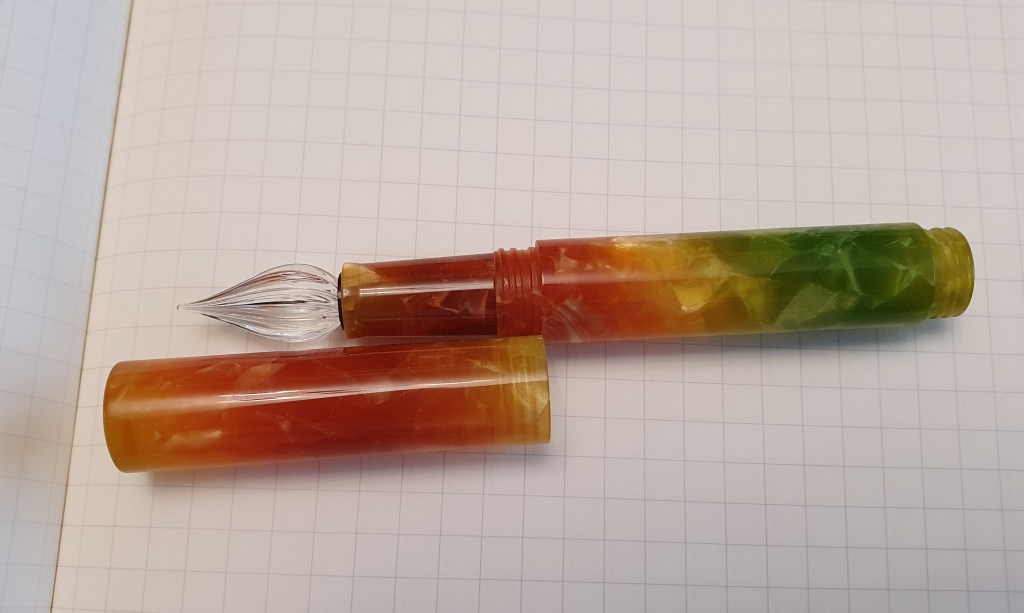
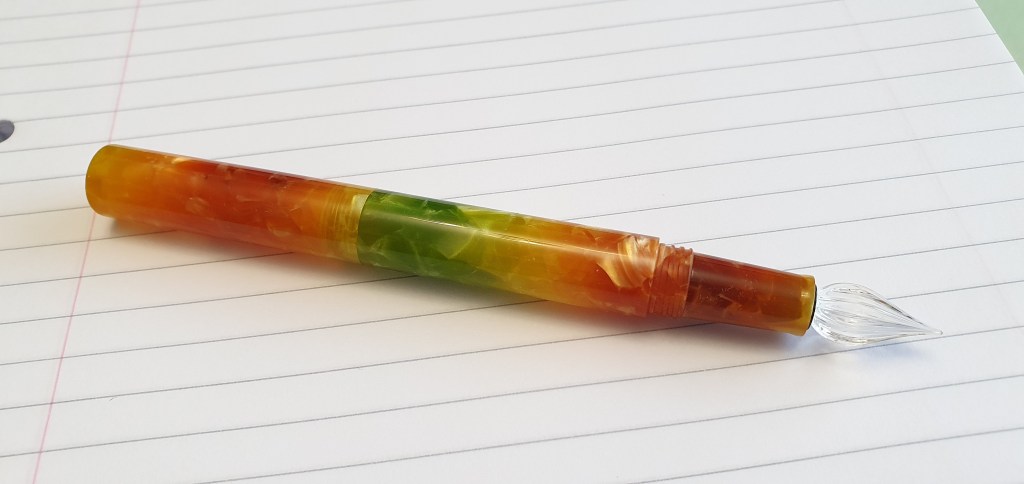
When ordering the pen, there was a choice of four colours: the names of the colours differ somewhat depending where you order but the choices were Black Ice Flowers, Red Ice Flowers (both of which looked like Koi fish colours), New Rose (the pink version like the colour of the pen in Anne’s review) or the one I chose, called Aurora or Autumn Leaf or Gradient Green. I have since learned that the same acrylic can be found on some Pen BBS models too. It is gorgeous blend of colours and in one of the marketing photos, the pen can be can be seen against an avenue of trees in their autumn colours.

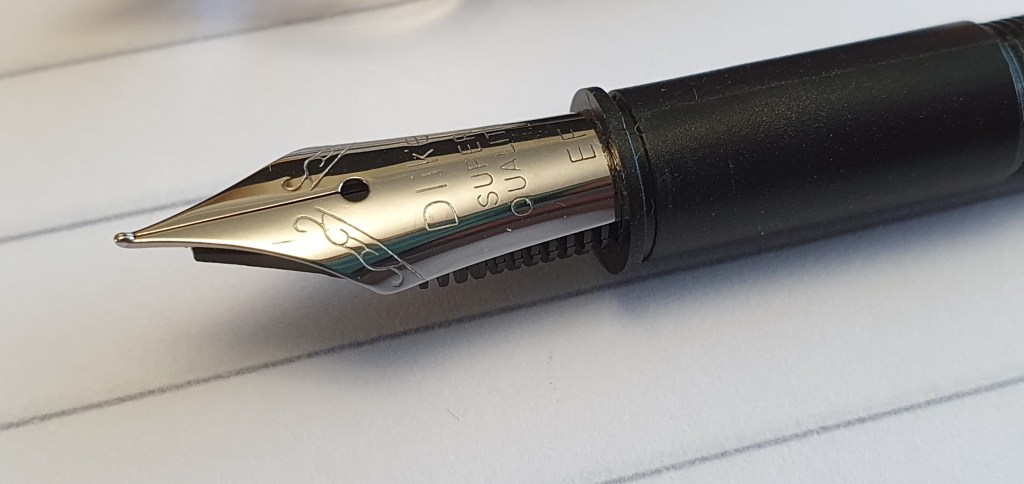
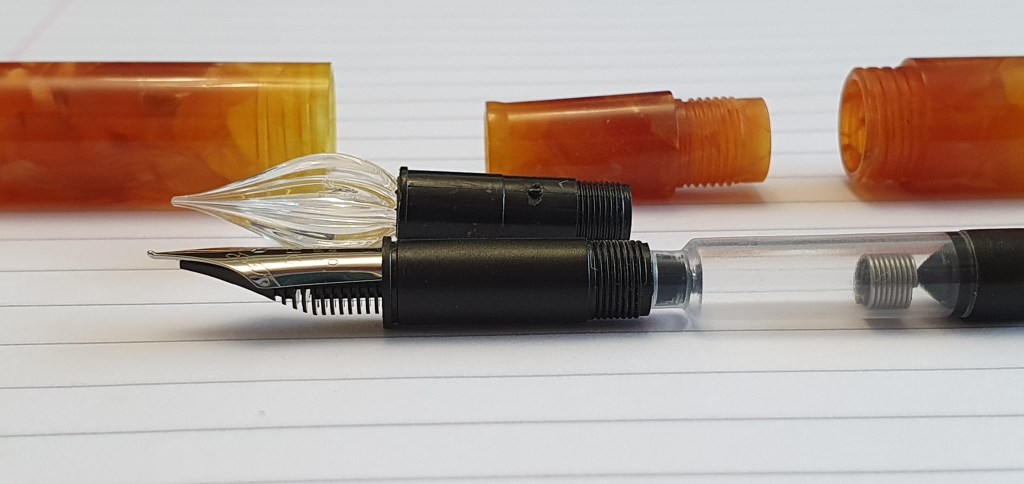
Secondly, apart from chosing your colour, you also have the option to chose a steel nib unit too. There were a few choices but I opted for the “bent nib” or what I would call a fude nib, as something a bit different. Whilst the glass nib has to be dipped in ink, it can easily be unscrewed from the section and replaced with a steel nib, and inked by a cartridge or converter or (although I have not tried), as an eyedropper.

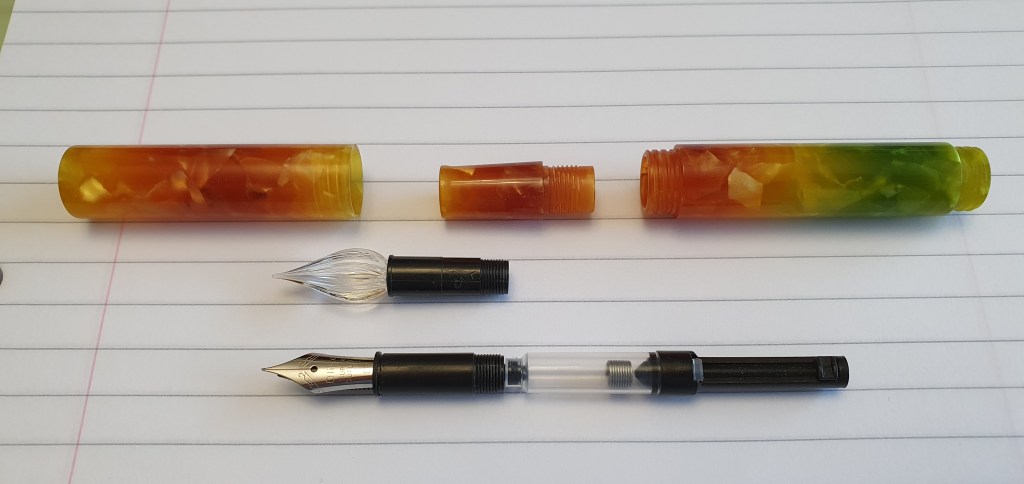
When my pen arrived, it came in a box marked Delike. The glass nib was fitted in the pen, but there was a separate little cellophane sleeve containing my fude nib and a simple converter, with a sliding plunger and a coiled spring ink agitator inside.

It was not until revisiting Anne’s review, that I realised that our pens were not quite the same. Her n6 was 125mm long, or under 120mm uncapped and not postable.

My pen, on the other hand was just 102mm long when capped, a tiny 95mm when uncapped but a super generous 140mm long when posted. As can be seen in my photo, there are screw threads at the end of the barrel, to screw the cap onto the back, where is sits flush with the barrel:

Now with cap posted to make a 140mm beauty!

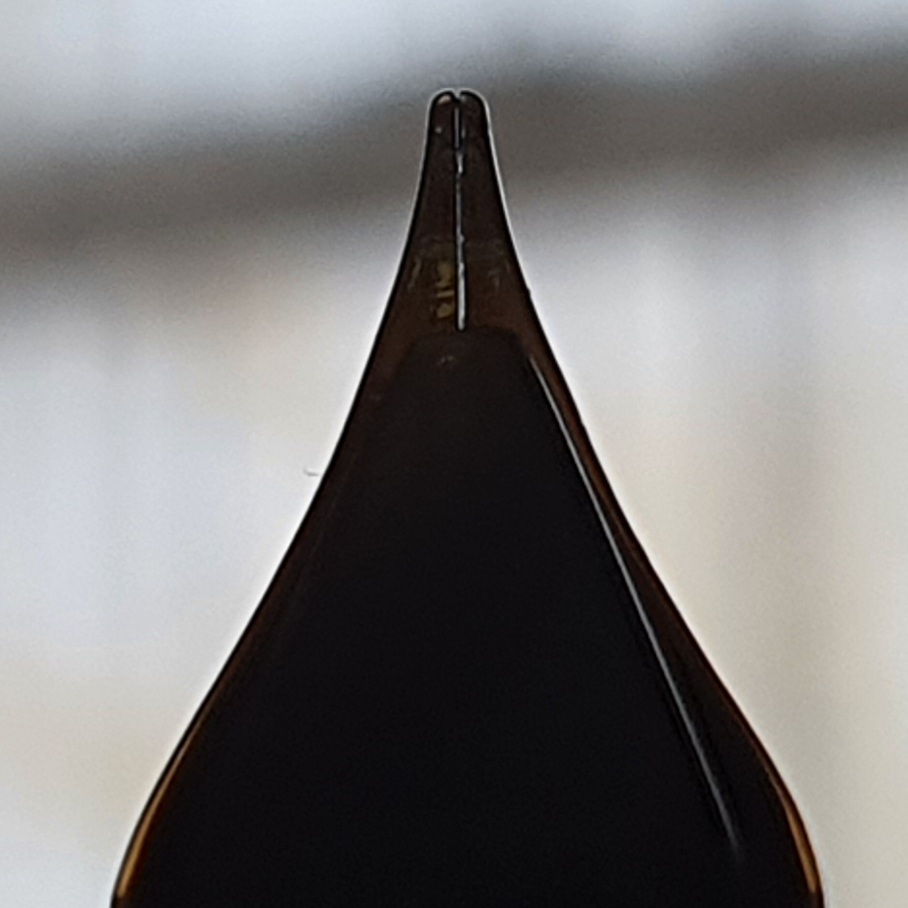
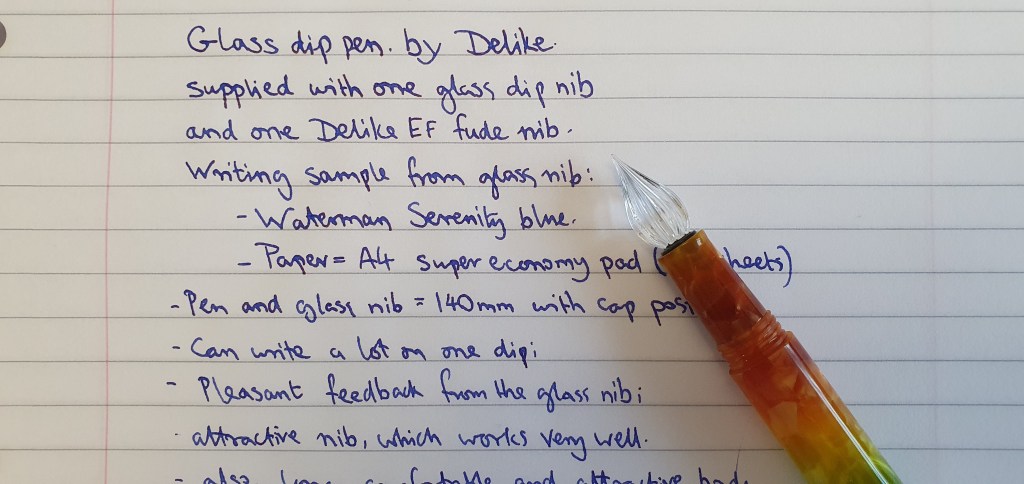
I was excited to try the glass nib. I dipped it in a nearby bottle of Waterman Serenity blue and tried it on a pad of file paper. For a glass nib pen, the result was very pleasing! It wrote with a fine line and a bit of audible feedback but not scratchiness. The ink flowed evenly and I found that I was able to get a good ten lines of A4 paper on one dip!

I tried a few other inks. That is the beauty of a glass nib pen: you just dip it in water, swish it around a bit and then dry it on a tissue and you are ready to dip again! It is great for sampling a few different inks.

I found that some inks worked better than others with the dip nib. I think it depends on the viscosity and how well the ink sits in the channels in the nib but it is fun to try a few different inks and see how it goes.

When I looked at the steel nib, my first thought was that they had made a mistake or else run out of bent nibs and had given me a standard fine nib instead. However, on closer inspection, I saw that it was I who was mistaken and that the nib was indeed bent.

Dlike EF bent nib. Interchangeable with the glass dip nib. Spelt “Dlike” on the nib but is “Delike” on the box.

I was a little wary of unscrewing the glass nib as I did not want to snap the lovely bulbous nib off. However, it came out quite easily.

Dlike steel bent EF nib and converter, in front of the glass dip nib.

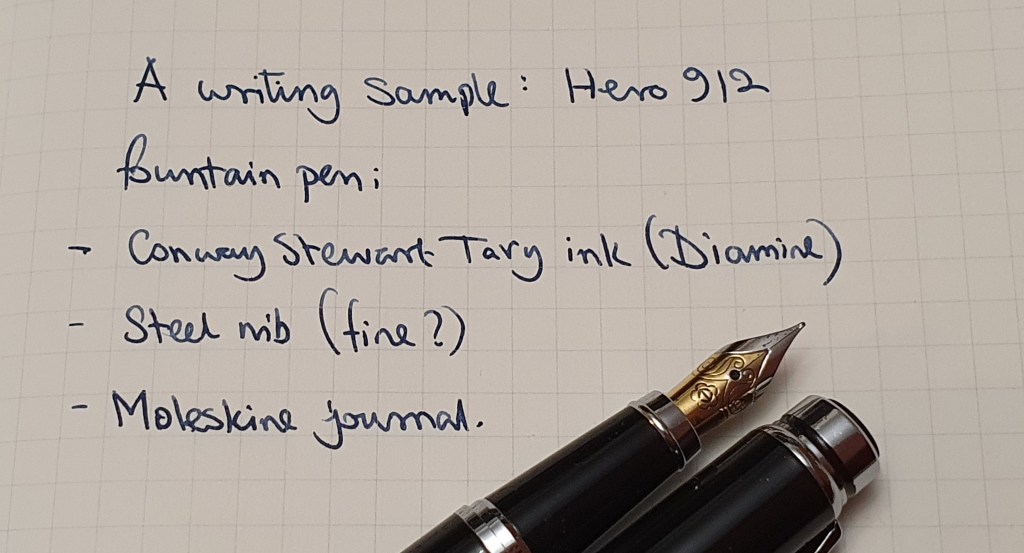
Here is a little writing sample, my first jottings with the glass nib:-

Writing sample, Glass nib and Waterman Serenity Blue. One one dip!

I also had a quick dip with the bent nib but have not yet inked it with the converter. Once it started, it was pleasant to use just writing normally as the bent tip gives narrow down strokes and broad cross strokes, like an architect grind. I will experiment some more with this shortly when I am done with testing the glass nib.

What you get in total, for a modest £21.00.

I am very excited at the possibilities of the cap-able glass dip nib. It is great to be able to sample lots of inks with minimal fuss, without having to ink up a pen and then wash it out thoroughly. Secondly, this one is so easily transportable, unlike my previous all-glass dip pen which is rather delicate and lives in its cardboard box and is anchored inside with elastic loops at both ends.

This pen is about the same size when capped, as a Kaweco Sport and as such, it fits nicely into a Kaweco Sport sleeve. Once our pen club re-convenes, I shall make a nuisance of myself dipping into inks that I have not tried before. A dip nib gives you the option to sample an ink, write for a few lines, or a few pages and then carry on or else try a different ink: no big decisions on whether to ink up a pen and to have to get through 20 or more pages before you can have a change.

Also, it is great for trying a little bit of mixing, without any fears of the inks being incompatible and gumming up your feed. Or you can re-discover inks that had been put aside due to causing nib creep: I can think of an orange ink and a yellow-green that I enjoy but do not use, because of that.

Finally a size comparison of the posted pen against the ubiquitous Safari:-

Moonman glass nib dip pen next to a Lamy Safari. The Moonman is about 10mm longer.

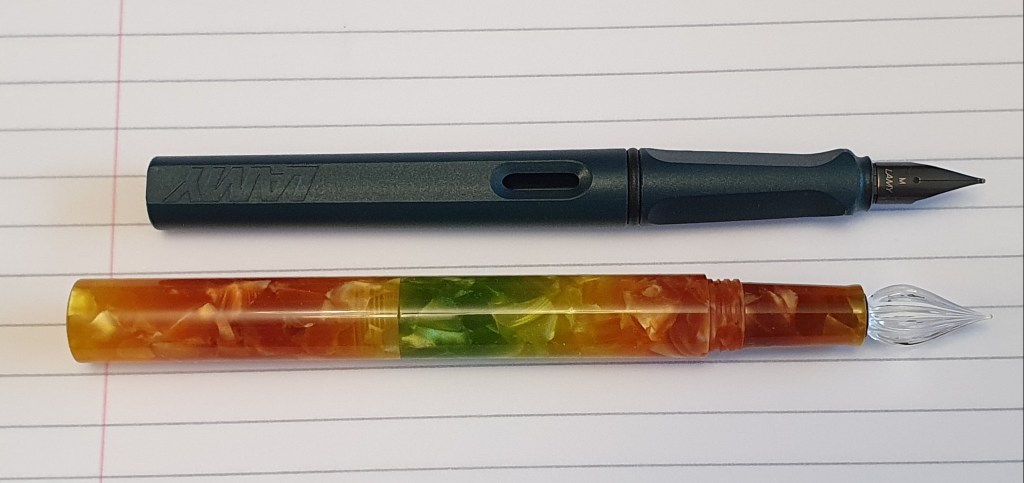
As you can see, the Moonman is a good comfortable length yet not heavy and the section is a good size for comfort while not too big for some ink bottles. I am a happy customer.

Another look at the Hero 912 fountain pen.

This weekend my fountain pen-related activities have included a typical mix of journaling, letter-writing, cleaning four pens that were empty or near empty, inking some others and a little nib tinkering. I unzipped a case of 24 lesser-used pens and pulled out a steel nibbed Parker Sonnet to help it write a bit wetter. This proved quite satisfying and I filled it with Quink blue black and added it to my currently inked.

Whilst looking through those 24 pens, I came across my Hero 912. This is not a particularly heralded model but has sentimental value as it was a gift from our cousins in China, on a holiday there in December 2017. I included a picture of it in my post of 14 December 2017, Travelling with ink, China 2017. Part 1: Meeting the Heroes. I do not know where they bought the pen: probably a department store in Shantou, their nearest big city and I suspect that it may have been the largest, most statesman-like and expensive of the pens available. It is always touching to receive a fountain pen as a gift, particularly if the givers are not particularly fountain pen people.

Hero 912 fountain pen

This particular trip to China, with its sensory overload of wonderful people, places, landscapes and impressions, catching up with as many friends and relatives as possible in a few crammed weeks, was later overshadowed for me by being hospitalised in Guilin with what I later discovered to be sciatica – a rather disabling bout of back pain radiating into the leg. Still, it was a memorable experience, I was very well looked after and where else could you get an MRI scan immediately and for £20?

I mention all this as I had not given the Hero the attention it deserved at the time. It is not a very common pen. There do not seem to be many mentions of it online, apart from me.

It is metal pen, with a glossy black lacquer finish and silver coloured fittings at both ends. The cap pulls off and looks, from the shape of the barrel, as though it is meant to be posted. It will post but makes the pen very back heavy and overly long.

The nib is stainless steel, bi-colour and rather small for the size of the pen. The nib grade was not shown but I would call it a fine. It was smooth, with the tines and tipping material nicely level but very firm and with a rather dry flow.

I was quite pleased with the texture of the paper showing here.

Under the barrel, removed by metal-to-metal threads, there is a collar to fit a standard international cartridge but a Hero branded, plastic slide converter was included.

The pen weighs a fairly substantial 41g capped, or 24.5g uncapped. The cap alone weighs 16.5g. Capped, the pen measures around 142m. Uncapped it is 118mm, and a massive 168mm if you dare to post it.

There is a white plastic inner cap. The cap is quite tight to pull off and so you would probably not want to use this for intermittent note taking. I find it reasonably comfortable to hold, with a tapering grip section (also lacquered metal) and a minimal step from section to barrel.

However I found the length at less than 12cm, to be a bit on the short side, unless holding the pen very low near the nib. Posting the metal cap is not ideal. Fortunately an easy solution lies in posting a light weight cap from another pen, to give you extra length without adding much weight or upsetting the balance. I found that a Lamy Safari cap posts quite well.

The barrel end, shaped for posting. Best not though.

The other issue for me, had been the dry nib. Today, after my recent success with the Parker Sonnet, I had a go at opening up the gap between the tines just a little to get the ink flowing, to write darker and with better lubrication. Before doing this I examined the nib under my x7 loupe and could see that, whilst there was a little gap between the tines at the breather hole, the tines were pretty tight at the tipping. This might suit someone with a heavy touch who writes in the under-writer style. However I am the opposite, mostly using an over-writer style and without using pressure.

Fortunately, this is not too hard to fix, with a little patience and the minimum of tools. One way to make the nib wetter in seconds, advocated by an old SBRE Brown video, is to bend the nib upwards very slightly as this will also have the effect of opening the tine gap a little. But a preferable way, I think, is to separate the tines without bending them upwards, if you can, by using brass shims to floss the tine gap.

My trusty Eschenbach x7 loupe, used almost daily.

With a little trial and error, this is done by starting with a very thin grade of brass shim and inserting a corner of the sheet into the breather hole, and then drawing it downwards and out through the tip. As it loosens, you may work the brass back and forth a little, up and down though the nib slit. The brass shim can also be inserted between the tines from the tipping end. Once you feel that it can move freely between the tines, you may stop or repeat with a slightly thicker grade if you want to go further. It is a good idea to stop frequently, blow away any metal residue or rinse in water and examine the results under the loupe again and test the writing experience with a dip in the ink.

Just a little light now between the tines, makes a big difference.

I did not go too far with this nib but just got the barest glimpse of daylight between the tines at the tipping material, which means that I can lay down ink without pressing down on the nib. You do not want to go too far with this, as it is harder to undo an overly wet nib.

I am pleased that the pen is now more usable, as a result of a little nib wrangling and the application of a handy Lamy Safari cap on the back. It now writes well with a smooth, fine line and joins my pen cups, newly inked with a cartridge of Kaweco royal blue. Given the right paper (something fairly smooth like Basildon Bond letter writing paper) this can be used and enjoyed as well as being a fond reminder of the kind and generous cousins in China.

Writing sample after easing the nib a bit.

The Pilot Capless: how to turn a pocket clip into a roll-stop.

I had avoided the Pilot Capless (or Vanishing Point) for a long time, as I could foresee the pocket clip being in the way. Eventually I succumbed to the temptation, unable to resist the all matt black version and bought one in June 2020.

Although I had heard good reports of the nibs on these pens, the 18k gold, medium nib on my pen was wonderful and exceeded my expectations. The writing experience was smooth, with a lovely degree of softness. Also, because of the generous ball of tipping material and an ample ink flow, lubricating the nib well, I found that I could hold the pen at less than the optimum “sweet spot” and it would still write almost as well.

Pilot Capless in the matt black finish.

If you are a lefty-overwriter, as I am, there is no escaping the fact that the clip on the Pilot Capless may be just where you would like to rest your thumb, in order to rotate the nib slightly inwards. To get the best flow from a nib, the two tines need to be held evenly to the paper, not one touching the paper before the other (although a soft nib compensates and adjusts itself to your grip, like the independent suspension on a car).

As I do not have a perfectly symmetrical grip, with finger and thumb either side of the pocket clip, I found that the Capless was best suited to my lefty-underwriting style, but this does not feel natural to me and I still find it difficult to write vertical lines which do not lean, either backwards or forwards.

I read an article online about how to perform a Pilot Capless “clipectomy”. This is not as easy as you might hope. It involves warming the nose cap to soften the adhesive that holds it on, and then pulling it away from the pen, so that you can get at the underside of the clip fastening, to prise open the folded metal wings of the clip that hold it on. You then replace the nose cone, and need to glue it in place again. You are left with unsightly holes in the nose cone where the clip used to be fixed (although they do not affect the air-tightness of the nib chamber). Some people like to paint the inside with lacquer or nail varnish before replacing the nose cone, to have some contrasting colour show through the holes, like the eyes of a little robot.

I did once make a tentative effort to perform this operation, first removing the nib unit from the pen and then warming the nose cone carefully over a flame. Once it was hot, I tried pulling it away but it would not move at all and I gave up, planning at some point to ask someone with more expertise.

In recent days, seeing the pen in my pen cup and rather unfulfilled, I decided to have a go at removing just the lower part of clip, since this is the part that obstructs my grip. I thought it may be possible to saw it off, near the top and then file the jagged edge smooth.

I prepared myself, with a metal hacksaw and slid a piece of cardboard under the clip to protect the black coating of the barrel. This proved more difficult than expected: the saw would not stay in the same grove and would slide left and right, scratching the coating of the clip wherever it went.

Giving up on this method, I then decided to bend the clip upwards, away from the barrel. This was very quick and easy and once it reached about 90 degrees, it simply broke off. This literally takes a few seconds.

Problem solved. Almost.

However, what takes longer is then trying to file the jagged edges smooth so as not to cause injury or discomfort. I slid cardboard under the remains of clip and used the metal file on my Leatherman, holding this in one hand and the pen in the other, braced against the table. Care is needed to avoid the file slipping and scratching the pen.

Using cardboard to protect the pen while filing the sharp edges.

I spent a bit of time on this stage, checking the results and blowing away the residue. It would have been nice to bend down the broken end of the clip to meet the barrel but I could not figure out a way to do this with pliers whilst still protecting the pen from marks, so I decided against it.

The result is far from perfect and obviously not expertly done. However, leaving aesthetics aside, the pen is now very much more usable and I have the freedom at last to hold it any way I want. It would still be preferable to remove it completely but as a quick fix, it has solved this lefty’s problem.

The former clip is now a roll-stop (before puffing away the filings).